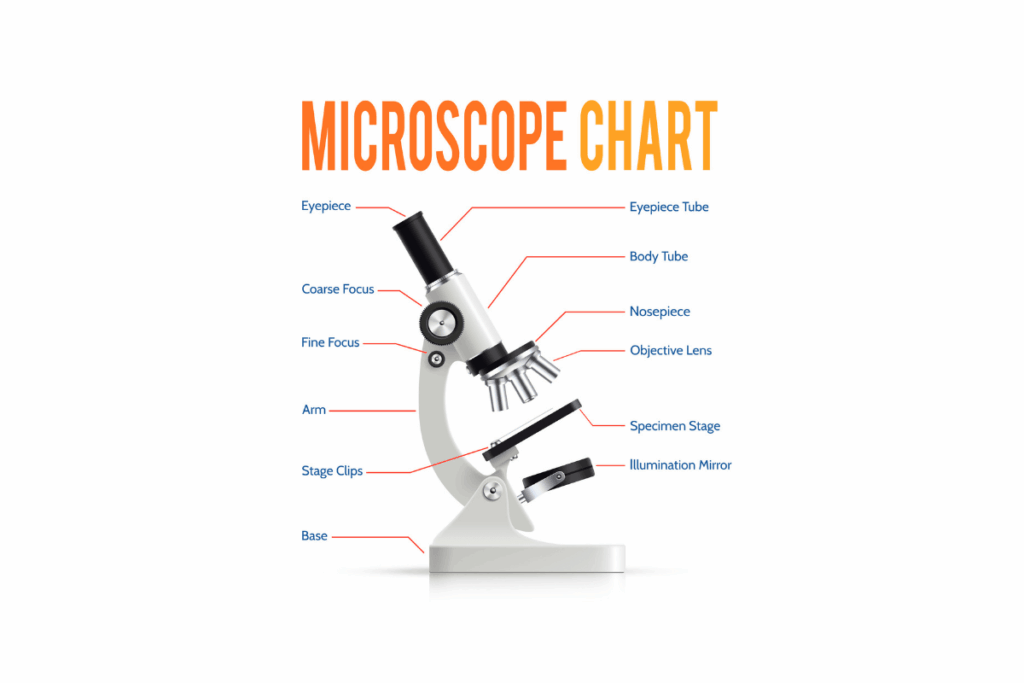
The microscope diagram highlights essential parts, eyepiece, objective lenses, stage, and focus knobs- each playing a key role in magnifying and focusing specimens effectively.
The guide covers the main types: compound (multi-lens), simple (single-lens), and electron microscopes (using electron beams) each with unique strengths and magnification capabilities.
Microscopes are indispensable in fields like biology, medicine, and education- helping learners and professionals explore cells, tissues, and microorganisms with clarity and precision.
Table of Contents
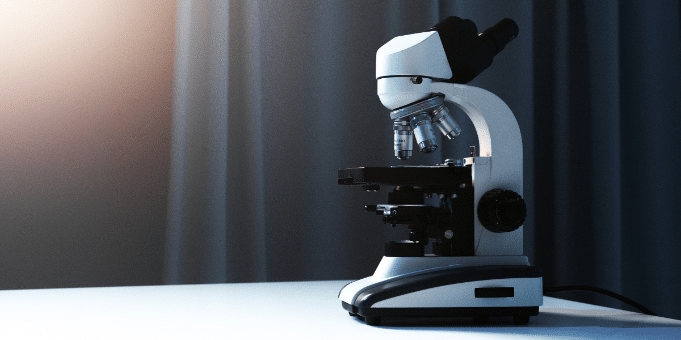
A microscope is a vital optical instrument used to magnify tiny objects or organisms, making them visible in detail. The microscope diagram helps learners visually understand its key parts- such as the eyepiece, objective lenses, stage, condenser, and light source- and how each component contributes to clear and accurate magnification. This guide simplifies the complex structure of microscopes and is ideal for students and science enthusiasts.
What is a Microscope and Microscope Diagram?
A microscope is a scientific instrument used to magnify small objects, such as cells and microorganisms, making them visible for detailed study. It works by using specialized lenses with varying magnification powers, allowing scientists to observe objects in fine detail.
Microscopes consist of structural components, such as the base, arm, and head- providing support -and optical parts that magnify and display images. Advanced models may also include electronic features for enhanced viewing. There are various types of microscopes, including light, dark-field, phase contrast, electron, and fluorescent, each designed to reveal specific details, from cellular structures to distinguishing between plant, animal, and bacterial cells.
Magnification is measured by how many times larger the image appears compared to the object, typically expressed in “times” like 10x (ten times larger). Resolution refers to the clarity and detail an instrument can reveal. The first compound microscope was invented by Zacharias Janssen in 1590. Today, microscopes are specialized tools used for studying everything from plant cells to metals.
Structural Parts of a Microscope and Their Functions
Microscopes are made up of three main structural parts: the head, arm, and base.
Head(Body Tube): Also called the body or eyepiece tube, the head is a cylindrical tube that holds the eyepiece on one end and connects to the nosepiece on the other. It aligns the eyepiece and objective lenses to enable clear imaging. In binocular microscopes, the head is adjustable for optimal viewing in a binocular microscope diagram.
Arm: The arm links the base to the head and supports the eyepiece tube, ensuring stability and ease of handling when transporting the microscope. Advanced models may have an articulated arm, allowing flexibility in positioning the head for enhanced viewing angles.
Base: The base is the foundation of the microscope, providing support and stability. It houses essential components, such as the light source, switches, and electrical systems that power the microscope.
Microscope Diagram with Labels
Microscopes use various optical parts to magnify and display clear images of specimens. Here’s an overview of each component:
Eyepiece (Ocular Lens): Positioned at the top, the eyepiece magnifies the image for a second time, typically with powers of 10X or 15X. It’s the lens closest to the viewer’s eye.
Eyepiece Tube: This tube holds the eyepiece above the objective lens. In binocular microscopes, it’s adjustable for better viewing, while monocular microscopes feature a fixed tube.
Diopter Adjustment: Found only in binocular microscopes, this knob adjusts the focus of one eyepiece to compensate for differences in vision between the two eyes.
Nosepiece: A rotating structure that holds the objective lenses. By turning the nosepiece, you can switch between lenses of different magnification powers (4X, 10X, 40X, and 100X).
Objective Lenses: These lenses are closest to the specimen and provide primary magnification. They come in varying sizes, with the smallest offering the lowest magnification and the largest, typically retractable 100X lenses, providing the highest magnification, often with oil immersion.
Adjustment Knobs:
Fine Adjustment Knob: This small knob moves the stage slowly for fine-tuning the focus, especially under high magnification.
Coarse Adjustment Knob: A larger knob that moves the stage quickly for focusing under low magnification.
Stage: The platform where the specimen slide is placed. It typically includes clips to hold the slide in place. A mechanical stage allows for precise slide movement using control knobs.
Stage Control Knobs: These knobs allow you to move the stage left, right, forward, or backward to position the specimen within the field of view.
Aperture: A hole in the stage that allows light from the illuminator to pass through and illuminate the specimen.
Microscopic Illuminator: The light source for the microscope, which may be a mirror (in some compound microscopes) or an electric bulb. Common types include tungsten-halogen lamps and mercury vapour lamps.
Condenser: Lenses located beneath the stage that focus light onto the specimens. They are crucial for producing sharp, clear images at higher magnifications (400X and above). High-quality microscopes may feature an Abbe condenser for even higher clarity.
Diaphragm (Iris): Found under the stage, the diaphragm controls the amount and intensity of light reaching the specimen. It can be adjusted to alter the light’s intensity and focus.
Condenser Focus Knob: This knob adjusts the position of the condenser to focus light onto the specimen.
Abbe Condenser: A specialized condenser for high-quality microscopes that enables very high magnifications (over 400X), offering greater clarity by adjusting the numerical aperture.
Rack Stop: Prevents the objective lens from getting too close to the specimen’s slide, protecting both the lens and specimen from damage.
Light Switch: Controls the power to the illuminator, turning the light source on or off.
Brightness Adjustment: Regulates the light bulb’s intensity by controlling the voltage supplied to it.
These optical components work together to provide clear, magnified views of specimens, essential for accurate observation and analysis.
How Does a Microscope Work?
Microscopes act like superpowered magnifying glasses, letting us see objects invisible to the naked eye. We place a thin slice of our sample, like a cell or insect wing, on a slide. The light then travels down through the microscope, focusing on the specimens with the help of a lens called a condenser. Another lens, the objective, bends the light rays, creating an initial magnified image. This image is then further enlarged by the eyepiece, acting like a second magnifying glass. By peering through the eyepiece, we can finally observe the greatly magnified world, revealing hidden details of the tiny specimens.
Microscope Functions
Magnification: Enlarges objects invisible to the naked eye.
Enhanced Resolution: Sharpens images to reveal fine detail.
Illumination: Provides controlled light to make specimens visible, even if transparent.
Scientific Exploration: Enables researchers to study biological cells, tissues, microorganisms, and more at microscopic scales.
Diverse Applications: Used for quality control in industries, education(especially biology), forensic analysis, and environmental research.
Mastering the Microscope Diagram:
Know Your Microscope: Understanding the microscope’s parts helps you grasp how they contribute to image formation in microscope diagrams.
Practice Makes Perfect: Start with simple microscope diagrams, label them, and test yourself. Correlate the Microscope diagrams with your own observations under the microscope.
Explore 3D Models: Use 3D visualizations of microscopic structures to complement Microscope diagrams and gain a more dynamic perspective.
Invest in understanding the microscope diagram, and unlock the wonders of the microscopic world!
How to Draw Microscope Diagram – Let’s Get Started!
Drawing a microscope diagram is an excellent way to reinforce your understanding of its components and structure. Follow these step-by-step instructions to create a simple, clear microscope drawing.
Step 1: Starting with the Eyepiece
Begin by drawing the top part of the microscope: the eyepiece. Make a small, rounded square shape to represent it. From the eyepiece, draw two straight vertical lines downward. Below these lines, add two thin rectangular shapes as the eyepiece base. Near the base, draw some circles to represent adjustment knobs. This completes step one.
Step 2: Adding Lenses
Next, extend more vertical lines downward to form the lens section. Draw several diagonal shapes side by side, connected by a rounded line on the side, outlining the nosepiece area where lenses attach. Inside this section, sketch several thin rectangles with rounded ends to depict the objective lenses. Finish this step by adding a curvy line on the right side to complete the lens body.
Step 3: Arm and Stage
Now, draw the arm, the curved structure that holds the microscope body. Starting from the top knob, sketch a curved line that extends downward. Then, draw the stage- the flat platform where specimens are placed, using thin rectangular shapes. Step three is complete with these structural elements.
Step 4: Finishing the Base
Draw a rounded shape beneath the arm and stage to form the base of the microscope, which provides stability. Add small circles to indicate screws or textured parts. Draw a small mirrored shape on a hinge at the base to represent the light source or reflector. Complete this step by adding rectangular and rounded shapes near the base to give it structural detail.
Step 5: Adding Details
Enhance your drawing by adding texture using straight and curved lines on different parts, such as the arm, lenses, and base. Feel free to add creative elements around the microscope, such as other scientific tools or background museum or lab items, giving context to your drawing.
Step 6: Adding Color
Finally, bring your microscope diagram to life with color. Use light greys, blues, or any shades you prefer to highlight various parts. Coloring not only makes the diagram visually appealing but also helps in memorizing the parts better. What colors will you choose?
Types of Microscopes
Simple Microscope: Uses a single magnifying lens, akin to a powerful magnifying glass. Was the earliest type used by Antonie van Leeuwenhoek in the 1670s for observing microorganisms. Suitable for low magnification (up to 300X).
Compound Microscope: Multiple lenses (eyepiece and objective) combined for higher magnification (40X to 1000X). Widely used in biological and medical labs. Features include a rotating nosepiece, fine focus, and illumination systems.
Electron Microscope: Uses a beam of electrons instead of light, with much higher magnifications (up to 1,000,000X) and resolution. Includes types like Transmission Electron Microscope (TEM) and Scanning Electron Microscope (SEM). Requires vacuum chambers and magnetic lenses.
Stereo Microscope (Dissecting Microscope): Offers lower magnification (20X-50X) but provides a 3D view by using separate optical paths for each eye. Ideal for examining larger, opaque specimens.
Fluorescence Microscope: Uses ultraviolet light to excite fluorescent dyes in specimens, emitting light for detailed visualization. Common in biological imaging and diagnostics.
Phase Contrast Microscope: Enhances contrast in transparent specimens without staining by converting phase shifts in light to brightness changes, enabling observation of living cells.
Confocal Microscope: Employs point illumination and pinhole apertures to eliminate out-of-focus light, producing sharper 3D images. Used in tissue imaging and developmental biology.
Scanning Probe Microscope: Investigates nanoscale surfaces atom by atom, using a sharp probe interacting physically or electrically with the specimen.
Compound Microscope
A compound microscope is an optical instrument used to magnify small objects, making them visible for examination and analysis. It typically consists of multiple lenses and is primarily used in fields like biology, medical science, and materials science. Here’s a breakdown of its key components and features:
Key Components:
Eyepiece (Ocular Lens):
The lens that the user looks through to view the object.
Usually provides magnification of 10x (but can vary).
Objective Lenses:
Multiple lenses with varying magnifications (typically 4x, 10x, 40x, and sometimes 100x).
These lenses are located on the revolving nosepiece, which allows the user to switch between different magnifications.
Stage:
The flat platform where the sample or slide is placed for observation.
It often has clips to hold the slide in place.
Stage Clips:
These hold the slide firmly in place.
Condenser:
A lens system under the stage that focuses light onto the specimens.
It improves the resolution and contrast of the image by concentrating light on the object.
Illumination (Light Source):
A light bulb or mirror that provides light to illuminate the specimens.
The light can be adjusted to provide optimal brightness and contrast.
Coarse and Fine Focus Knobs:
These knobs help bring the image into clear focus.
The coarse knob adjusts focus in large increments, while the fine knob allows precise focus adjustments.
Arm and Base:
The arm supports the upper parts of the microscope, and the base provides stability.
The arm is where the user grips the microscope to carry it.
Applications:
Biology: For observing cells, tissues, and microorganisms (e.g., bacteria, fungi).
Medical Diagnostics: For analyzing blood samples, tissues, and infections.
Material Science: For inspecting materials at a microscopic level, such as metals or polymers.
Education: Commonly used in classrooms for teaching students about microscopic organisms and cells.
Advantages and Disadvantages of Compound Microscope
Advantages
Disadvantages
Magnifies objects up to 3000x, revealing hidden details
High magnification can cause blurriness
Broader field of view compared to simpler microscopes
Specimen preparation can be time-consuming
Versatile for live or preserved specimens
Only thin specimen slices can be clearly focused at once
Affordable compared to advanced microscopes
Requires practice for optimal use
Binocular Microscope Diagram
A binocular microscope uses two eyepieces to view specimens, allowing stereoscopic or 3D vision. Unlike monocular microscopes with one eyepiece, the binocular design provides a more natural, comfortable experience by reducing eye strain and improving depth perception.
Key Components:
Eyepieces (Ocular Lenses): Two lenses, usually 10x or 15x magnification, adjustable to fit the user’s eye distance.
Objective Lenses: Typically 3 or 4 lenses on a rotating nosepiece with magnifications like 4x, 10x, 40x, and 100x.
Nosepiece: A rotating mechanism holding the objective lenses, enabling easy switching between magnifications.
Stage: Flat platform that holds the specimen slide, often equipped with clips or mechanical stages to secure the slide.
Illumination System: Adjustable light source usually located at the microscope base, providing transmitted light from below or reflected light from above.
Condenser: Lens system beneath the stage focusing light onto the specimen for clearer images.
Diaphragm: Adjustable aperture that regulates light intensity reaching the specimen, located under the stage.
Focus Knobs: Coarse knob for rough focusing, fine knob for precise adjustments.
Arm and Base: Structural support and stability, housing the light source.
Interpupillary Distance Adjustment: Allows customizing the distance between eyepieces for comfortable binocular viewing.
Compound Microscope Diagram Class 9
A microscope diagram for Class 9 typically illustrates the essential parts of a microscope, which is used to magnify small objects. Key components include:
Eyepiece (Ocular Lens): The lens at the top through which the user views the magnified image.
Objective Lenses: Located near the specimen, these lenses provide different magnifications (e.g., 4x, 10x, 40x).
Stage: The platform where the specimens slide is placed for observation.
Stage Clips: Hold the specimen slide in place on the stage.
Coarse and Fine Focus Knobs: Used to adjust the clarity of the image. The coarse knob moves the lens or stage for focusing, while the fine knob refines the focus.
Mirror or Light Source: Provides illumination to the specimens.
Arm and Base: The structural parts that support and stabilize the microscope.
In a Class 9 microscope diagram, these components are labeled to help students understand the function of each part for proper use and operation.
Conclusion
From its early invention to today’s advanced models, microscopes have evolved into essential tools for medical diagnostics, biological research, materials science, and education. Understanding the parts, how it works, and the different types prepares students and researchers to explore and appreciate the intricate details underlying life and matter. Mastery of microscope diagrams and practical drawing enhances comprehension and engagement. As technology advances, microscopes will continue to unlock deeper insights into the microscopic realm and fuel scientific discovery.
The microscope’s optical components include: 1. Eyepiece (ocular) 2. Eyepiece tube (eyepiece holder) 3. Objective lenses 4. Nose piece 5. Coarse and Fine adjustment knobs 6. Stage 7. Aperture 8. Microscopic illuminator
Who is the father of the microscope?
Antoni van Leeuwenhoek (1632-1723) is the father of microscopy.
What is a microscope used for?
A microscope is used to magnify tiny objects that cannot be seen by the naked eye. It helps scientists examine cells, bacteria, and other microorganisms, enabling research in biology, medicine, and material science. Microscopes are central in studying disease, developing treatments, and quality control in various industries.
What is a compound microscope?
A compound microscope magnifies using two lenses to compound (multiply) the level of magnification. The first is the objective lens with magnification options like 4x, 10x, 40x, or 100x. The second lens is the eyepiece lens.
Which lens is used in a compound microscope?
A compound microscope employs two convex lenses for magnification. The ocular lens is near the eye, and the other is the objective lens.
Why are microscope diagrams important?
Microscope diagrams are essential for visualizing the components and understanding how each part works together to provide magnification. They help students, researchers, and users learn how to properly operate and maintain a microscope, ensuring accurate observations.
Are microscope diagrams the same for all types of microscopes?
Microscope diagrams differ based on the type of microscope. A compound microscope features multiple objective lenses, while a stereo microscope has two optical paths for 3D viewing. Electron microscopes (SEM, TEM) include electron beams and detectors.
How do I read a microscope diagram?
To read a microscope diagram, start by identifying the major components: eyepiece, objective lenses, stage, and light source. Follow the labeled arrows or text to understand how light travels through the specimen and how the components interact to produce an image.
Authored by, Muskan Gupta Content Curator
Muskan believes learning should feel like an adventure, not a chore. With years of experience in content creation and strategy, she specializes in educational topics, online earning opportunities, and general knowledge. She enjoys sharing her insights through blogs and articles that inform and inspire her readers. When she’s not writing, you’ll likely find her hopping between bookstores and bakeries, always in search of her next favorite read or treat.